Battery switch on travel trailer function is crucial for managing your RV’s power. Understanding how to use your battery switch correctly ensures efficient power management from shore power, your generator, and your RV batteries. This guide breaks down the different types of switches, troubleshooting common issues, and essential safety precautions, empowering you to confidently handle your travel trailer’s electrical system.
We’ll cover everything from basic operation and different switch types (single, dual, rotary) to wiring diagrams and troubleshooting tips. Learn how to prevent common problems, extend the life of your battery switch, and safely power all your RV’s appliances and systems. This guide provides a step-by-step approach, making even complex electrical concepts easy to grasp.
Battery Switch Types and Their Advantages/Disadvantages

Choosing the right battery switch for your travel trailer is crucial for managing power and extending battery life. Different switch types offer varying levels of control and complexity, each with its own set of pros and cons. Understanding these differences will help you make an informed decision based on your specific needs and budget.
Single Battery Switches
Single battery switches are the simplest type, offering a single on/off function for a single battery bank. They are inexpensive and easy to install, making them a popular choice for smaller trailers with basic power requirements. However, they lack the flexibility of more advanced switches, offering no way to isolate or selectively use batteries. This can be problematic if you need to charge one battery while using another or if you experience a problem with one battery.
A single switch also doesn’t allow for switching between different power sources, such as shore power and solar panels, efficiently.
So, you’re prepping for your awesome travel trailer adventure? First things first: understand your power! Check out this guide on the battery switch on travel trailer function to avoid any dead-battery surprises. Knowing how to manage your trailer’s power is key, and once that’s sorted, don’t forget to secure your trip with comprehensive travel insurance.
A good option to explore is Aon travel insurance , ensuring peace of mind on the road. Happy travels!
Dual Battery Switches
Dual battery switches provide more control than single switches, allowing you to isolate two battery banks independently. This is beneficial for managing house batteries (used for appliances) and starting batteries (used for the engine). You can use one bank while charging the other, ensuring sufficient power for both starting and running your trailer’s systems. Dual switches are more expensive than single switches but offer greater flexibility and improved battery management.
However, they still may not offer the comprehensive control of more advanced systems.
Rotary Battery Switches
Rotary switches offer the most versatile control, typically managing multiple battery banks and allowing selection of different power sources. They often include positions for connecting to shore power, solar panels, and both battery banks individually or combined. This advanced control allows for optimized charging and efficient power usage. Rotary switches are generally more expensive and complex to install than single or dual switches, but they offer superior functionality and flexibility, especially for trailers with larger power demands and multiple power sources.
A common drawback is the increased complexity; improper operation can lead to accidental short circuits if not handled correctly.
Comparison Table
| Feature | Single Switch | Dual Switch | Rotary Switch |
|---|---|---|---|
| Number of Banks Controlled | One | Two | Two or More |
| Power Source Selection | No | Limited | Multiple (Shore Power, Solar, etc.) |
| Cost | Low | Medium | High |
| Complexity | Low | Medium | High |
| Maintenance | Low | Low | Medium (periodic cleaning may be needed) |
Troubleshooting Common Battery Switch Issues
Dealing with a malfunctioning battery switch in your travel trailer can be frustrating, leaving you without power when you need it most. Understanding common problems and their solutions can save you time, money, and a lot of frustration. This section Artikels troubleshooting steps and preventative measures to keep your battery switch running smoothly.Troubleshooting a faulty battery switch often involves systematically checking different components and connections.
Remember safety first! Always disconnect the negative battery terminal before working on any electrical components.
Common Battery Switch Problems and Solutions
A range of issues can arise with your travel trailer’s battery switch. These problems usually manifest as a complete lack of power, inconsistent power supply, or problems charging the batteries correctly. Let’s look at some of the most frequent issues and how to address them.
- Problem: No power to any appliances. This suggests a problem with the switch itself or the connections leading to and from it. Solution: First, check the switch’s position – ensure it’s turned to the “on” position. Then, visually inspect all wiring connections at the switch and the battery terminals for corrosion, loose connections, or broken wires. Tighten any loose connections and clean corroded terminals with a wire brush.
So, you’re gearing up for that awesome travel trailer adventure? First things first: understand your power! Knowing how to use the battery switch on travel trailer function is crucial for keeping your lights and appliances running. Then, before you hit the road, sort out your insurance. Check out Aon travel insurance options; peace of mind is priceless, especially when exploring new places.
Get those two things sorted, and you’re well on your way to a smooth and worry-free trip!
If the problem persists, the switch may need replacing.
- Problem: Intermittent power or flickering lights. This often indicates a loose connection or a problem with the wiring. Solution: Carefully examine all wiring connections, paying close attention to any points where wires may be rubbing against metal or sharp edges. Also, check the battery cables for any signs of damage or wear. Replace any damaged cables or connectors.
- Problem: Batteries not charging correctly. The battery switch might be preventing the charging system from reaching the batteries. Solution: Verify the switch is correctly positioned to allow charging from either the shore power or the alternator. Check the charging system’s fuses and breakers. If everything else seems fine, a faulty switch may be the culprit.
- Problem: Switch feels hot to the touch. This is a strong indicator of a significant problem. Solution: Immediately turn off the switch and disconnect the power. A hot switch indicates excessive current flow, possibly due to a short circuit. Do not attempt to repair this yourself; call a qualified electrician or RV technician.
Preventative Maintenance for Battery Switches
Regular maintenance is crucial for extending the life of your battery switch and preventing unexpected failures.
- Regular Inspections: Visually inspect the switch and its connections at least twice a year, or more frequently if you use your travel trailer extensively. Look for corrosion, loose connections, or any signs of damage.
- Cleaning Connections: Clean the battery terminals and switch connections with a wire brush and baking soda paste to remove corrosion. Apply a corrosion inhibitor to the terminals after cleaning.
- Tighten Connections: Periodically tighten all connections to ensure a secure and reliable electrical connection.
- Proper Storage: When not in use for extended periods, disconnect the battery’s negative terminal to prevent parasitic drain. This also helps reduce corrosion buildup.
Potential Causes of Battery Switch Failure and Solutions
Several factors can lead to battery switch failure. Addressing these potential causes proactively can help avoid costly repairs.
- Corrosion: Corrosion on terminals and connections is a frequent cause of failure. Solution: Clean and apply corrosion inhibitor regularly.
- Loose Connections: Loose connections create resistance and can lead to overheating and failure. Solution: Tighten all connections periodically.
- Overheating: Excessive current draw or faulty wiring can overheat the switch. Solution: Identify and correct the source of the excessive current. Replace any damaged wiring.
- Water Damage: Exposure to moisture can cause corrosion and short circuits. Solution: Ensure the switch is properly sealed and protected from the elements.
- Mechanical Wear: Over time, the switch’s internal components can wear out. Solution: Replace the switch as needed.
Wiring Diagrams and Electrical Connections: Battery Switch On Travel Trailer Function
Properly wiring a battery switch in your travel trailer is crucial for safe and reliable power management. This section details the process, emphasizing safety precautions and providing a clear wiring diagram. Remember, working with electricity can be dangerous; if you’re unsure about any step, consult a qualified electrician.Wiring a battery switch involves connecting the batteries, the switch itself, and the trailer’s electrical system.
The goal is to create a circuit that allows you to easily disconnect the house batteries from the trailer’s electrical system when not in use, preventing drain and potential damage. This process requires careful attention to detail and adherence to safety protocols.
Battery Switch Wiring Diagram
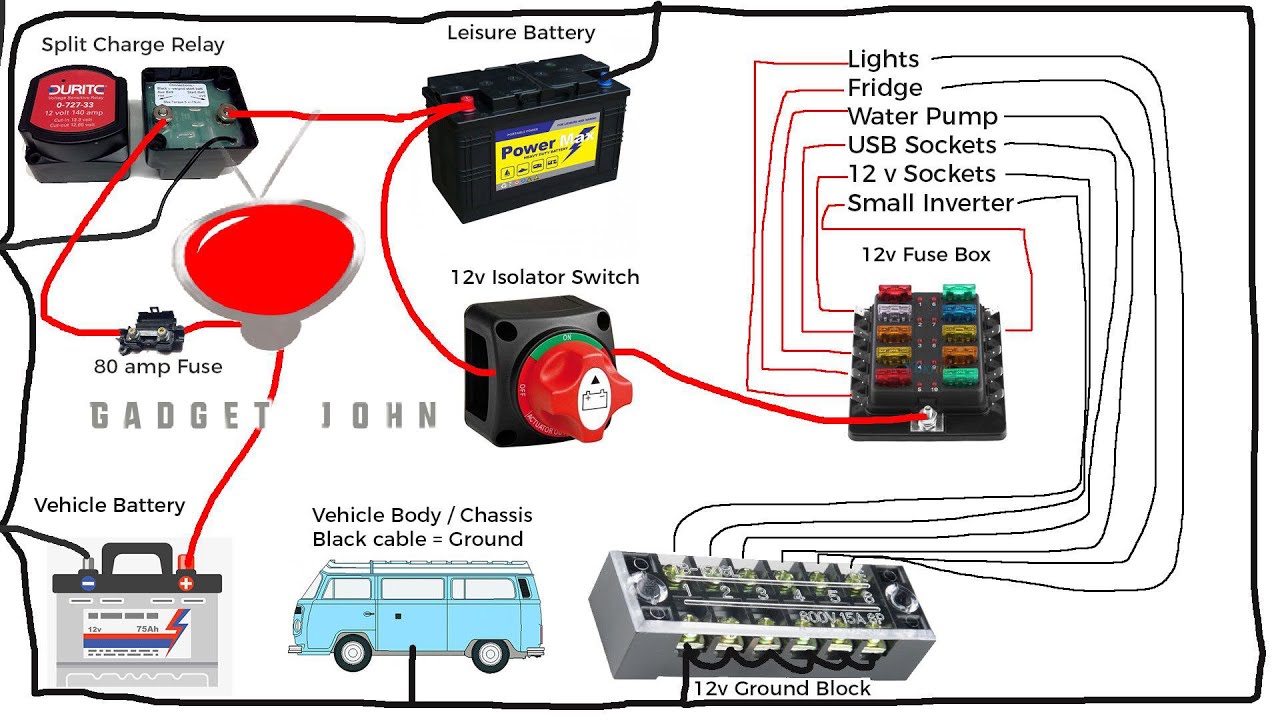
The following describes a typical wiring configuration for a battery switch in a travel trailer. This diagram assumes a two-battery setup with a standard battery switch that allows for switching between batteries or disconnecting both. Variations exist depending on the switch type and the trailer’s specific electrical layout.Imagine a diagram showing a battery switch in the center. On the left, two batteries are connected to the switch using appropriately sized wires with in-line fuses near each battery.
The positive (+) terminal of each battery connects to a separate input on the switch. The negative (-) terminals of both batteries are connected together and then to a common ground point in the trailer. On the right of the switch, the output of the switch connects to the trailer’s main distribution panel via a suitably sized wire with an additional fuse or circuit breaker at the distribution panel’s input.
Each wire should be clearly labeled (+), (-), and its function (e.g., “Battery 1,” “Battery 2,” “Main Panel”). The diagram also shows the position of the switch for “Battery 1,” “Battery 2,” “Both,” and “Off.”
Safety Precautions for Electrical Work
Before beginning any electrical work, always disconnect the negative (-) terminal of your batteries to prevent accidental shorts and shocks. This is paramount to ensuring your safety. Use appropriate safety glasses to protect your eyes from sparks or debris. Work in a well-ventilated area to avoid inhaling fumes. Never work on electrical systems when wet or in damp conditions.
Use insulated tools to avoid accidental shocks. If you’re unsure about any step, consult a qualified electrician.
Components of a Battery Switch Circuit, Battery switch on travel trailer function
A typical battery switch circuit includes several key components working together to provide safe and controlled power. These components play vital roles in protecting both your equipment and yourself.
- Batteries: These are the power source for your travel trailer’s electrical system. Usually 12V deep-cycle batteries.
- Battery Switch: This is the central component, allowing you to select which battery or batteries power the trailer or disconnect them entirely.
- Fuses/Circuit Breakers: These protective devices prevent overcurrent situations that could damage wires or components, or even start a fire. They are typically placed near each battery and at the main distribution panel. Fuses are one-time use, while circuit breakers can be reset after tripping.
- Wires: These carry the electrical current between the batteries, the switch, and the trailer’s electrical system. Appropriate gauge wire must be used to handle the current.
- Main Distribution Panel: This panel distributes power to various circuits in the trailer.
Remember, proper sizing of wires and fuses/circuit breakers is crucial for safety and efficient operation. Consult electrical wiring guides and your trailer’s documentation for specific recommendations based on your system’s amperage requirements. Improper sizing can lead to overheating and potential fire hazards.
Impact of Battery Switch on Travel Trailer Systems
Your travel trailer’s battery switch is the central control for your 12V DC power system, acting as a gatekeeper for power flow from your batteries to various onboard appliances and systems. Understanding its function is crucial for safe and efficient operation of your trailer. Improper use can lead to unexpected power outages or even damage to your equipment.The battery switch directly influences the functionality of your 12V and indirectly affects your 120V AC systems.
It controls the flow of power from your trailer batteries, supplying power to essential 12V components. While the 120V system (typically powered by shore power or a generator) is largely independent, the battery switch’s state can influence the operation of certain 120V devices that use battery power for certain functions, like the refrigerator’s control panel or a 12V-powered fan in the AC unit.
Battery Switch Operation and 12V System Power
The battery switch’s primary role is to connect or disconnect your trailer’s battery bank from the 12V system. In the “ON” position, power flows freely from the batteries to devices like lights, water pumps, and interior fans. Switching it to “OFF” completely isolates the battery bank, preventing any drain and protecting the battery from damage, even when the trailer is disconnected from shore power.
A “START” position on some switches provides a direct connection to the starting battery for the engine of a tow vehicle. This is essential to avoid draining your house batteries when starting the tow vehicle. Failure to properly operate the switch can result in a completely dead battery bank, leaving you without lights, water, or other essential 12V systems.
Battery Switch Influence on 120V Systems
While the 120V AC system runs independently from shore power or a generator, some components rely on the 12V system for certain functions. For example, many refrigerators use 12V power for their control panels and internal fans, even when operating on 120V. If the battery switch is turned off, these functions might be disabled, potentially leading to improper refrigeration.
Similarly, some converters or inverters might require a 12V signal to initiate the 120V AC power conversion, and a switched-off battery switch can disrupt this process.
Consequences of Incorrect Battery Switch Operation
Incorrectly operating the battery switch can lead to several issues. Leaving the switch in the “ON” position while the trailer is stored for extended periods will result in a fully discharged battery, rendering your 12V systems inoperable. Conversely, turning the switch off while using 12V-dependent 120V systems can cause those systems to malfunction. In extreme cases, a constantly discharged battery can lead to irreversible damage, requiring expensive replacement.
Visual Representation of Battery Switch Interaction
Imagine a central hub (the battery switch) with several branches extending to different systems. One branch leads to a cluster of lights (interior, exterior, running lights). Another branch connects to a water pump, which in turn provides water to the sink and shower. A third branch supplies power to a small 12V fan within the refrigerator’s control panel (even if the refrigerator’s main power comes from the 120V system).
When the battery switch is “ON,” power flows smoothly through all branches, energizing these systems. When “OFF,” all power flow is cut, protecting the battery and preventing drain. The “START” position, if available, provides a separate, direct path to the starting battery for the tow vehicle, keeping the house batteries unaffected.
Mastering your travel trailer’s battery switch is key to a smooth and enjoyable RV experience. By understanding its function, troubleshooting potential issues, and practicing preventative maintenance, you’ll ensure reliable power for all your onboard systems. Remember safety first when working with electricity! This guide equips you with the knowledge to confidently manage your power, allowing you to focus on the adventure ahead.
Question & Answer Hub
What happens if I leave my battery switch in the “off” position for an extended period?
Leaving the switch off for too long won’t damage the switch itself, but it will prevent your house batteries from charging, potentially leading to a discharged battery.
Can I use a battery switch from a different RV model in my travel trailer?
Potentially, but it’s not recommended. Ensure the amperage rating and wiring configuration match your trailer’s system to avoid damage or fire hazards. Consult a professional if unsure.
How often should I check my battery switch for corrosion?
Inspect your battery switch and connections at least twice a year, or more often if you live in a humid climate. Clean any corrosion immediately to prevent poor connections.
My battery switch is making a clicking sound. What could be wrong?
A clicking sound often indicates a faulty switch or a problem with the wiring. Check for loose connections, blown fuses, or a possible short circuit. If you’re not comfortable troubleshooting electrical issues, call an RV technician.
